 EN

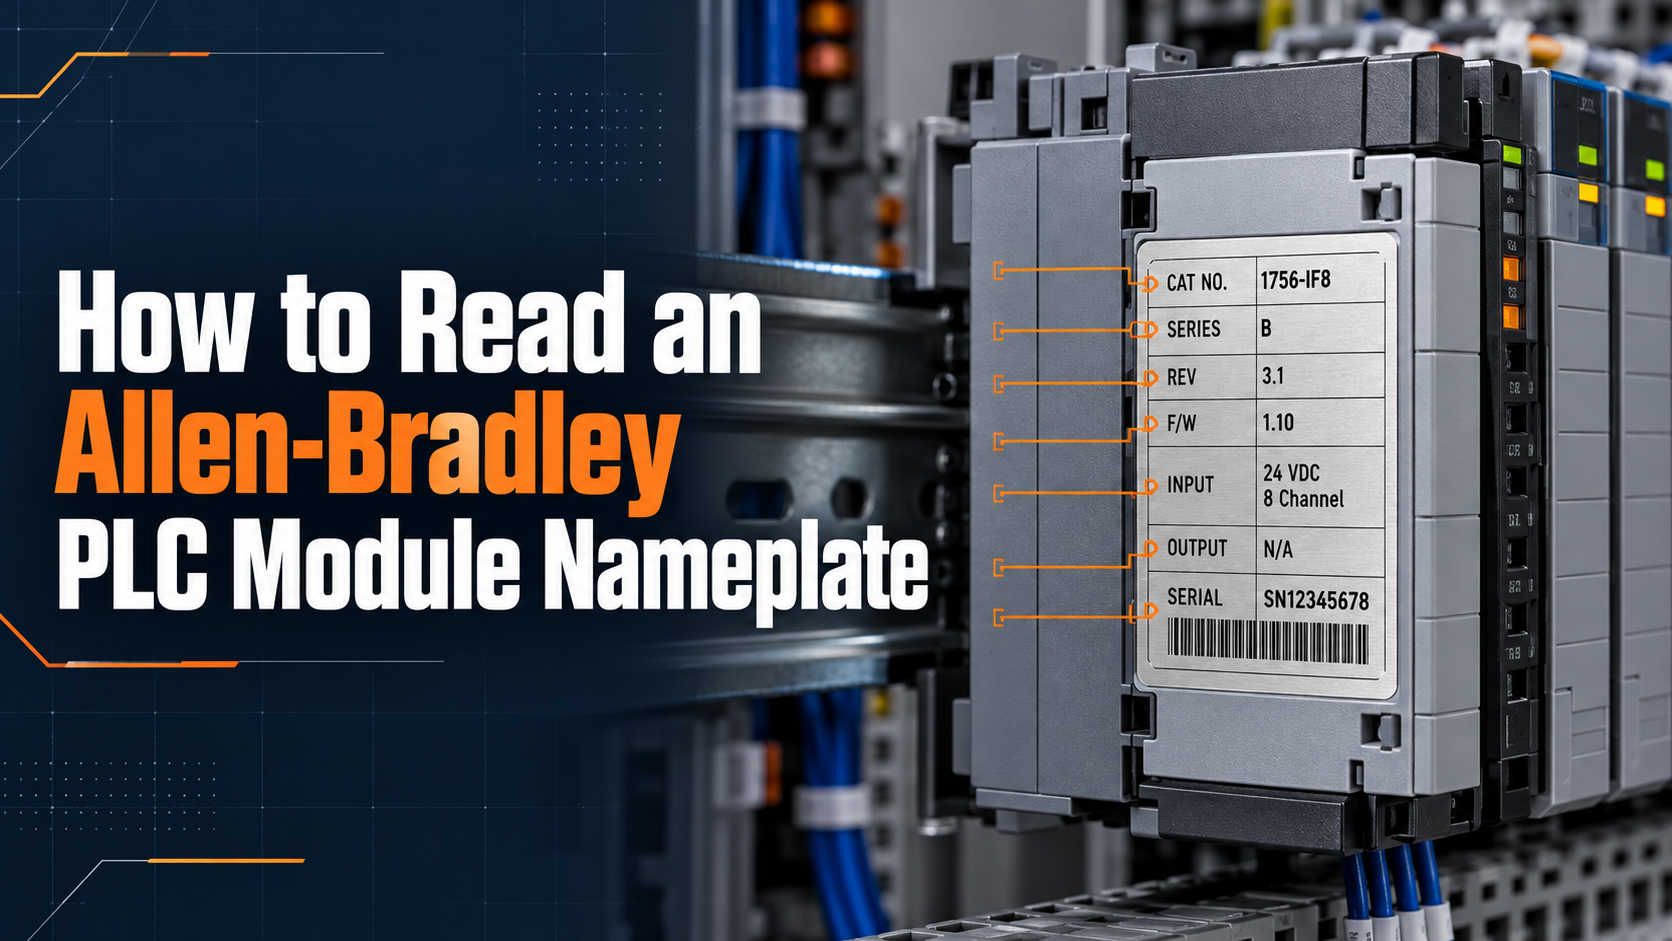
An Allen-Bradley PLC module can look almost identical to another unit and still be the wrong replacement. A single character in the catalog number, a different Series letter, or a firmware mismatch may affect wiring, software compatibility, electronic keying, and commissioning.
This practical guide explains what to photograph, what to copy, and what to verify before ordering. Nameplate layouts vary between ControlLogix, CompactLogix, SLC 500, PLC-5, POINT I/O, FLEX I/O, drives, and communication products, but the same reading method works across most Allen-Bradley families.
Find the Full Catalog Number
Start with the field marked CAT. NO., Catalog Number, or Cat No. Copy every character exactly as printed, including hyphens, suffixes, option codes, and coating or environmental designations. Examples such as 1756-IB16, 1769-IF4, and 1746-OW16 identify different platforms and functions, but the base family number alone is not enough to select a replacement.
The catalog number can reveal the platform, module type, channel count, voltage class, communication protocol, or a special option. Two modules may have nearly identical front panels while supporting different signal types or terminal arrangements. Never complete an uncertain character from memory. If a letter or number is damaged, photograph the entire module and compare the front legend, side label, connector, and chassis position with official product documentation.
Read the Series and Hardware Revision
Next, locate the Series marking, often shown as SER A, Series B, or a similar letter. The Series identifies a hardware generation within a catalog number. A newer Series is not automatically a drop-in replacement for every earlier installation. Changes can affect supported firmware, module profiles, features, communication behavior, or installation requirements.
If the label also lists a hardware revision, record it separately. For systems that use electronic keying, the controller project may compare the configured vendor, product type, catalog identity, and major or minor revision with the installed device. Before ordering a different Series, review the module configuration and the applicable Rockwell Automation compatibility information.
Check the Firmware Information
Processors, communication adapters, motion products, and other intelligent modules may show a firmware value marked FW REV, F/W, Firmware, or Firmware Ver. Write down the complete major and minor revision. Firmware can determine which Studio 5000 or RSLogix version, Add-On Profile, network feature, or controller revision is required.
Confirm Electrical Ratings and Module Function
For I/O and power-related products, read the voltage, current, frequency, channel count, and input or output type. These details prevent dangerous substitutions. A 24 V DC input module is not equivalent to a 120 V AC input module, and a relay output is not interchangeable with a transistor output simply because the housings look similar.
Also identify the field-wiring hardware. Depending on the product family, the removable terminal block, wiring arm, connector, base, or terminal assembly may be a separate item. Check whether it is included with the replacement or will be reused from the existing module.
Record the Serial Number and Manufacturing Data
The S/N or serial-number field identifies the individual unit. Record it for traceability, warranty checks, inspection records, and supplier documentation. Depending on the product, the label may also show a date code, manufacturing week, plant code, build version, or country of manufacture.
Date-code and serial-number formats vary by product family. If a product notice or service advisory applies, follow the identification method stated in that specific Rockwell Automation document. A serial number alone does not confirm authenticity or operating condition; it is one part of a complete inspection.
Review Certifications and Environmental Markings
Nameplates can include UL, CE, UKCA, hazardous-location, marine, temperature, enclosure, or other regulatory markings. These approvals belong to a specific product version and operating condition. Do not infer a required certification from another module in the same family.
For regulated environments, confirm the exact certification against the project specification and current manufacturer documentation. Safety instructions on the product and in the installation manual take priority over general replacement advice.
Capture Useful Nameplate Photos
A good photo often prevents more errors than a long email. Use even lighting, hold the camera parallel to the surface, and make sure every character is sharp. Avoid glare from a flashlight or cabinet light.
- A close-up of the complete nameplate
- The front of the module with all LEDs and legends visible
- The side and rear connectors or keying features
- The module installed in its chassis, rack, or base
- The terminal block, wiring arm, or connector part number
- Any carton label, seal, damage, or repair sticker
Keep the original full-resolution files. Cropped or compressed images can hide a suffix, punctuation mark, or revision value that changes the identification.
Build a Complete Replacement Request
Before contacting a supplier, combine the nameplate details with the installation requirements. This gives the supplier enough information to check stock, compatibility, condition, and included accessories without relying on appearance alone.
| Information to Provide | Why It Matters |
|---|---|
| Complete catalog number | Identifies the exact product and options |
| Series and hardware revision | Helps check generation and keying compatibility |
| Installed and nameplate firmware | Supports software and migration planning |
| Voltage, signal type, and channel count | Confirms electrical suitability |
| Terminal or base part number | Prevents an incomplete replacement order |
| Required quantity and delivery country | Allows accurate stock and logistics checks |
| Requested condition | Clarifies new, surplus, used, or refurbished expectations |
Match the full catalog number first, then review Series, revision, firmware, electrical ratings, wiring hardware, and required approvals. Keep a verified program backup and follow the machine builder’s procedures before replacing any controller or communication module.
Random Stock Models
The following 60 models were randomly selected from our recent stock lists. Availability can change, so please contact us with the exact model, required quantity, condition, and destination for a current quotation.
| No. | Model Number | No. | Model Number |
|---|---|---|---|
| 1 | M-EDC-PS1012CB5F5 | 31 | TETRA 4010 |
| 2 | AM503B | 32 | 1786-RPFM |
| 3 | PCO5 PCO5000000AS0 | 33 | LRD3355 |
| 4 | CI590-CS31-HA - 1SAP2211000R | 34 | PN:50123684-001FRE |
| 5 | ABB 3BSE020508R1 DI801 | 35 | HEIA406630R1 ZT374A-E 9022/004 |
| 6 | MTN647895 REG-K/8x230/16 | 36 | RMLS-14 |
| 7 | 9000-41034-0401005 | 37 | F3113A |
| 8 | DX111-FBP.0 UMC100 1SAJ611000R0101 | 38 | ETRSEQ.0003 |
| 9 | AIR-ANT2547V-N | 39 | SS-4BHT-72 |
| 10 | aci1230 | 40 | 152100 901 |
| 11 | GE VR7430-2DRDT | 41 | TSXDEY08D2 |
| 12 | 9318/12-11-10mA | 42 | KL3052 |
| 13 | TBS50 15855 | 43 | ABB GJR2240900R0001 XV370A-E 9024/021 |
| 14 | 6ES7134-6HD00-0BA1 | 44 | TC806D1056 |
| 15 | 8746-9-2 | 45 | EP1502 103830 REV:1.22.9 |
| 16 | 6197-0-0028 | 46 | MU-KDPR05 |
| 17 | EW 100 G3 | 47 | 400UNI 820BA229 |
| 18 | 3900-02-10 RTD:PT100 | 48 | 51308307-175 CC-TCNT01 |
| 19 | MA3751Z | 49 | MTN6705-0008 |
| 20 | EXU3-1742-0329 | 50 | PRS-1AIP1 F01U064686 |
| 21 | DT 370 | 51 | CR1000 CR1021_04 |
| 22 | REF.04813 | 52 | PM300 50797 |
| 23 | RXV-35-4K | 53 | ABB PM571 / 1SAP130100R0170 |
| 24 | 7SJ6022-4EB30-1FB0-1FB0 | 54 | NZMN1-A100 |
| 25 | CLV422-0010 PN:1022548 | 55 | 1C31169G02 |
| 26 | ABB 1SD A066324 | 56 | VAS/100.30 62703310 |
| 27 | 8910DPA43V14 | 57 | 53.602.0E AC5360B.0Z |
| 28 | 10D14 | 58 | P000UE1DEF0 |
| 29 | ABB AT/S 4.6.2 | 59 | RXMA1 RK211063AN |
| 30 | 500-033170 | 60 | C04T8R00PB050M |
Request a Quote
Send the model number, quantity, destination, and required condition. Choose Email or WhatsApp for a fast enquiry.
Table of Contents
- Find the Full Catalog Number
- Read the Series and Hardware Revision
- Check the Firmware Information
- Confirm Electrical Ratings and Module Function
- Record the Serial Number and Manufacturing Data
- Review Certifications and Environmental Markings
- Capture Useful Nameplate Photos
- Build a Complete Replacement Request
- Random Stock Models
- Request a Quote